Monday, March 25, 2013

Birthday and Fruit cake

I get excited about baking birthday cakes..... because you can be very elaborate with them. I take my time searching, bookmarking recipes, improvising, procuring stuff from the market, finding ways to dress it up....my whipping cream decorations are a far cry from perfection.

So, when I was thinking of making a devil's food cake with layers of creamy richness for my hubby's b'day....he threw a surprise at me....'no creamy stuff, no chocolate'

WHAT!

Did I hear well? no chocolate!!?? OMG . But all my bookmarked recipes have chocolate.

A quick survey of my fav blogs led me to this Orange cake by Soma of Ecurry.
Saved the day...:)
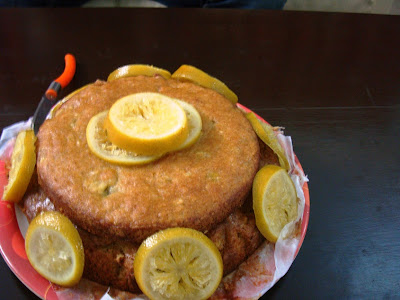
I've used a variety which is termed as "mausmi" in India...not the orange we generally use. I was not very sure of the results, but it came out a winner...yipeee

SERVES 10–12

INGREDIENTS

For cake 

  1. 3 Mausmi
  2. 2⅓ cups sugar
  3. Unsalted butter, for greasing the pan
  4. 2½ cups flour, plus more for pan
  5. 2 tsp. baking powder
  6. 1 tsp. baking soda
  7. 1 tsp. orange extract
  8. 3 eggs
  9. 6 tbsp. extra-virgin olive oil


For glaze
  1. ¼ cup fresh orange juice (I used packed juice)
  2. ¼ cup confectioners' sugar

For garnish

  1. 2 oranges, sliced in thin strips
  2. 1/2 cup sugar
  3. 1 cup water


INSTRUCTIONS

For cake 
1. Trim about ½" from the tops and bottoms of oranges; quarter oranges lengthwise. Bring 6 cups water to a boil and add oranges. Bring water back to a boil; drain. 
2. Repeat boiling process twice more with fresh water. 
3. Put oranges, 1 cup sugar, and 4 cups water into a saucepan over medium-high heat. Cook, stirring often, until sugar dissolves and orange rind can be easily pierced with a fork, about 30 minutes. 
4. Remove pan from heat and let cool to room temperature.
 5.Heat oven to 350°F. Grease a 9' round cake pan with butter and dust with flour; line pan bottom with parchment paper cut to fit. Set pan aside.
6. Whisk together flour, baking powder, and baking soda in a medium bowl and set aside.
7. Remove orange quarters from syrup, remove and discard any seeds, and put oranges into the bowl of a food processor. Pulse until oranges form a chunky purée, 10 to 12 pulses.
8. Add sugar, reserved flour mixture, orange extract, and eggs and process until incorporated, about 2 minutes.
9. Add olive oil; process until combined. 
10. Pour batter into prepared pan; bake until a toothpick inserted in center comes out clean, 40 to 45 minutes. Let cool for 30 minutes. 

For glaze
In a small bowl, whisk orange juice and confectioners' sugar to make a thin glaze. Remove cake from pan and transfer to a cake stand or plate. Using a pastry brush, brush orange glaze over top and sides of cake; let cool completely. 

For garnishing
Bring 3-4 cups water to a boil; add orange slices. Bring water back to a boil; drain. Repeat boiling process twice more with fresh water. Combine 1/2 cup sugar with 1 cup water in the pan and add the orange slices to the pan. Simmer at low to medium heat for about 15-20 minutes or until the the slices softens and the solution gets thick, syrupy and sticky. Remove oranges and reserve to garnish.
Garnish cake with confectioners’ sugar and orange slices.

I did not use icing sugar though. Good for me because the cake came out a little too sweet for my liking. I believe a little less sugar in the batter would make the cake taste even better....I've not tried it out though. If you do, please let me know how was it?


Tuesday, February 12, 2013

Dal dhokli/ Wheat flour dumplings with lentil mix

This is one of my favorite recipe. My mother used to make it, usually during cold days when the winters had not really settled in but the evenings and nights were chilly. A warm bowl of love....

Ingredients
For dal
Split moong chilka dal/ Green Gram dal- 1 katori
Chana dal/Bengal gram dal- 1spoon
Fresh ginger- grated, 1 spoon
Green chilli-1, chopped
Turmeric powder-1/4th tsp
Water- 2-3 katori

For dhokli
Whole wheat flour- 2 katori
Besan/Gram flour- 2 tbsp
Ghee/Clarified butter-1/2 katori approx
salt- to taste
Jeera/cumin seeds- 1/4 tsp

For tadka/tempering
Ghee/clarified butter- 2tsp
Red chilli powder-1/2tsp (adjust according to taste)
Jeera/Cumin seeds-1/2tsp

PS: katori is the household bowl in India and measurement differs from one region to another. The katori which I used holds about 150 ml of liquid.

Method
  1. Take wheat flour , add all the ingredients for the dhokli and knead it. Use lukewarm water to make dough. Keep aside for 15-20 min. Knead with both hands to make the dough smooth and divide into small balls. Flatten the balls and make a hole in the middle (something like a very thin doughnut). If you make it thick, then it will not cook well.
  2. Take all ingredients for the dal in a pressure cooker.
  3. Add the prepared raw "dhokli" and close the lid of the cooker. 
  4. The whole preparation should be ready after 3-4 whistles, but always remember cookers are different everywhere, also the water quality might differ and increase or decrease the cooking time. The best way to know if the dal dhokli is done, is to check the 'chana dal' for done-ness. 
  5. When the 'dal dhokli' is done, then temper it just before serving.
  6. Take ghee in a pan, put it on high heat. Add jeera and let it sizzle and brown. 
  7. Add red chilli powder and turn this mix into the cooker. Take care that the chilli should not get burnt. This will give a lovely reddish tinge  and a beautiful aroma to the preparation. 
  8. Serve hot.


Monday, January 21, 2013

Garlic bread- a trick recipe


    Who is not fond of warm, fragrant garlic bread?? Add a little grated cheese and you have got a winner!!
     They are a perpetual accompaniment of the Italian dishes and we love them.

     I buy garlic bread from a local bakery but sometimes  they are out of stock.
    Now what does a lazy foodie do?

    Find a trick!

    So here's what I do when I have to have garlic bread.
    Make garlic butter, smear on ordinary bread and toast it and….eureka! 

    Ingredients
  1. Butter- melted, 1 tbsp
  2. Garlic- 4-5 cloves, minced
  3. Salt & pepper- to taste (the use is optional)
  4. White bread-4 slices

  5. Method
  6. Mix garlic, salt and pepper in the butter
  7. Apply this garlicky butter onto the bread. I spread about 1tsp of the mix onto the bread.
  8. Place it on a non-stick skillet or tava. When one side it done, put the buttered side down and let it brown on a low flame.
  9. Sprinkle shredded cheese and microwave it for melted cheesey and garlicky bread
  10. Serve hot with your pasta or use it as a starter.


Thursday, January 17, 2013

Naan/ White flour flatbread- Khana restaurant style


Let me admit it..I feel proud of myself that I could make this amazing restaurant staple at home..yipee!! And that too without oven…yes, I made it on stove top. Amazing, isn't it! I really have to thank recipe website by Nishamadhulika for this easy method, but I'll share my experience with you.

Naan- for the uninitiated, it’s a kind of soft, differently flavored  flatbread we associate with big wedding parties and restaurants in India. It's made in big clay ovens or "tandoor"  as we call it. These triangular naans go best with North Indian dishes like kadhai paneer, dal makhni, dal fry, butter chicken, mutton in rich gravy, palak paneer,dum aloo and the list goes on. Basically heavy (read, rich in fats and spices) gravies go well with naan.

Ingredients
White flour- 200gm
Curd- 100gm
Baking soda/soda bicarb/Khane ka soda- 1/4 tsp
Sugar-1/2 tsp
Salt-1/4th tsp
Oil- 2 tbsp

Lukewarm water- to make dough

Method
  1. Take white flour/maida. Make a well in the centre.
  2. Pour oil and curd in this well and also add the rest of the ingredients.
  3. Mix thoroughly.
  4. Add lukewarm water and knead till a soft, pliable dough is formed.
  5. Keep covered for 2-3 hours in a warm place and let it rise. It should approximately double it's size.
  6. Divide the dough into 8-10 portions. Keep a little white flour on the side in which you can roll the portions like we do to make chapati.
  7. Roll one portion into a round. Apply butter on the edges and fold into a "D". Again apply butter onto the edges and fold to make a quarter of the circle. With a rolling pin extend this shape to make a triangular naan.
  8. Heat a skillet/heavy tawa
  9. Apply water on one side and place it on the skillet, water side down.
  10. You will observe bubbles on the visible side…this indicates that its browning at the other side.
  11. Remove from skillet and cook the other side (the bubbled one), on the flame directly.
  12. Serve hot

Monday, January 14, 2013

Savory cheese pasta cups

Sometimes you need something new to add to your evening snack apart from cheese and crackers. These pasta cups were a perfect filler. Easy to make and tasty (its got cheese..right!). I would say a thumbs -up to it anytime.

Cheese Pasta Cups
Please serve freshly made ones, reheating makes them lose flavor.  
Adapted from eCurry

Ingredients:
  1. 1 Cup Cooked Pasta: Boil the pasta as per instructions.( I used macroni..u can use shell or any other small sized pasta)
  2. 1 Cup Grated/Shredded Cheese (Any Cheese or any combination of 2 or 3 cheeses – cheddar, parmesean, amul or britannia cheese cubes will also do) I used grated paneer alongwith cheese cubes.
  3. 2 Tablespoons of whole wheat flour
  4. Salt to taste
  5. Black Pepper to taste
  6. Herbs (optional- any herbs you want to use…. I used dried Parsely and a mix of Italian seasoning)
  7. Garlic -3-4 cloves minced or grated
Preparation:
  • Lightly grease muffin pans/cup cake liners or silicon cups.
  • Combine all the ingredients above & spoon it into muffins pan or cup cake liners.
  • Bake at 375 Degree F for about 15-20 minutes or till the cheese melts & start to brown on the top.
  • Cool on a rack for about 10 minutes.
  • Carefully take out the Pasta cups. Serve Warm.